


Scott Crawford, board member of SimGHOSTS, explores the transformative potential of 3D printing for simulation technicians. Highlighting its beginnings in the 1980s and its evolution to accessible home devices, this article underscores the ease of creating prototypes with CAD software. SIMZINE’s and SimGHOSTS’ ongoing partnership aims to delve into simulation technology topics, emphasizing the growing accessibility and utility of 3D printing in the field.
In collaboration with
3D printers are capable and functional devices that will soon be staples in the arsenal of every hobbyist and tinkerer. The concept of designing and working with computer aided design (CAD) software and creating your own prototype models may seem intimidating to many, but the concept will quickly seem much more accessible once the hurdle of making your first print has occurred.
Introduction
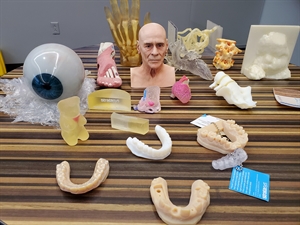
The concept of 3D printing began in the mid-1980s when the 3D Systems founder created a machine for rapid prototyping of parts. Based partially on the calculus concept of integrals, rapid prototyping technology relies on the creation of thin layers of material applied sequentially to approximate a solid structure. Only within the past decade has the technology advanced in terms of capability and price to deliver home and consumer devices. In current 3D printers, a filament (usually plastic) melts as it passes through a heated nozzle and is directed and applied at a controlled rate to outline and form these layers. Because these layers cool and solidify so quickly and are directed with accuracy measured in microns, it is possible to create movable and articulating parts in a single print. Products that would otherwise be difficult to manufacture or expensive to prototype are simple and quick to create and test.
Home printers most commonly use either PLA or ABS plastic for the filament. Some machines are capable of using metals and ceramics, but are not usually for home use.
Poly Lactic Acid (PLA): Prints at 200 Celsius, is biodegradable with low fume hazards, and is low cost. PLA is the most commonly used material for home printers.
Acrylonitrile Butadiene Styrene (ABS): Prints at 230 Celsius, has a longer lifespan than PLA, is hard and very durable. The downside is that it is oil based, requires ventilation during printing, and is less environmentally friendly. ABS is also commonly used, but more for parts where durability is required.
One other upgrade available even on home-use printers is the ability to print in more than one color or material type. These types of printers are known as dual extruder devices. Another material type that can be used in conjunction with those listed above in a dual extruder device is High Impact Polystyrene (HIPS). This material can be printed to support a structure that doesn’t have a solid layer, like an overhang or shelf, and can then be dissolved away after the print is complete.
Printing Process
Design
To begin, a 3D model must be designed or obtained. You can create your own using free websites such as Tinkercad. This site will allow creation of forms by overlaying many predefined and commonly used geometric shapes on a 3D grid. Each shape can be sized or rotated. Multiple pieces can be put together and grouped to form more complex shapes and each shape can also be made into a “hole” or “negative” to remove portions of the form to make your planned shape. A few hours of trial and error will open up the concept more clearly, and how-to videos and walkthroughs are available on the site. The designs can be saved as files with the extension .obj or .stl.
If you don’t have the time or desire to build your own CAD file, the internet and open source websites like Thingiverse may have a design ready for you. This site allows people to share their designs with the world for free. Quick searches for terms like “heart” reveal over 5,000 models, with designs ranging from lockets to full cardiac anatomy models.
Software Rendering
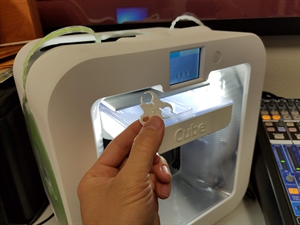
After the CAD file is designed or downloaded, it must be converted by software into a series of thin slices and geometric connections to outline the design. While a solid structure could be produced, it would be heavy, take a long time to print, and require lots of material. Some printers will have software designed to work exclusively with them, like the Cube from 3D Systems, while others will interface with a third party program. One such program is Slic3r. Slic3r will convert the .stl or .obj file into the code that is used by the printer to control the movement of the nozzle in 3D space and control the location and amount of material to be advanced through the nozzle. This set of instructions for the printer is called G-code. While it sounds complex, and it is, this process has been automated for you through the work of software designers, mathematicians and engineers, and is again available free through open source software development. Although the process is automated by the software, the initial use will require some user input so the software knows how to write the code for your system. Commonly required elements that will need to be input are the size of the “bed” (the dimensions of the 3D printer area), the temperature (or at least type of material) you will use for your print, the density of the piece you would like to have printed (often entered as a percentage with 10-20% being strong enough for most designs), the thickness of the layers (this will affect the speed of printing and smoothness of the final product), and the type of “infill” (the shape of the inner, low density portion of the design). The “infill” is of less significance to most models, and refers to the interconnected shape of squares or hexagons that are put in place of the solid structure of the design and allows for the lower density of material.
Printing a G-code File
The G-code file must be sent to the printer. Some printers have a memory card port directly on the control board that can be used to load the G-code file; others will connect to the computer using a USB cable, and some will even connect through a local or wireless network connection. Instructions from your printer manufacturer will help you make this connection.
While dozens of 3D printer manufacturers exist, some with proprietary design and interface programs, the prevailing view on 3D printers is that they should be inexpensive, well supported and accessible. As such, several programs are available to streamline the above processes.
Repetier-Host and Cura are two such programs. These programs have the ability to import a CAD file, slice the file, write the G-code for the printer, send the G-code directly to the connected printer, and start and stop the printing directly from the software.
How Do I Get Started?
Select a Printer
Introductory printers are available from ~$200-$800, with most differences being the size of the print bed, the types of material that can be used and the support of software and community resources. Brand name products like MakerBot Replicator+ ($2,499) sell at a premium but are user-friendly and well designed. A product like the Anet A8 ($170) may appear under multiple names when trying to search for information, making support more difficult, and must be assembled completely before use (plan on at least 6-8 hours).
Quick Troubleshooting
If your printer is having trouble, two common problems are related to bed leveling and filament advancement.
Bed leveling – Each printer should have some way to adjust the height and level of the print bed. This adjustment can likely be performed with a small crescent or allen wrench. A properly adjusted print bed will have the nozzle at the same height across the entire surface of the print bed and should have a gap only the thickness of a piece of paper.
Filament advancement – As the printer begins to print, it should make a small outline of material to prime the nozzle and prepare to print. If this is not happening, the filament may be broken or not in contact with the advancement mechanism. Manual pressure, or the assistance of a pair of pliers, may be required to engage the filament in the advancement mechanism. This can be performed best during a maintenance cycle or even as the print begins.
READ ALSO